Do you have a secure Wi-Fi network and a computer running macOS? Do you want to monitor the traffic of the devices connected to this network? Look no further, here’s how to do this step by step using Wireshark!
Wireshark is a very popular network protocol analyzer which understands many different network protocols out of the box and shows their data packets in a powerful GUI. The following instructions are based on macOS Mojave 10.14.6 running Wireshark 3.2.2 and may not work without changes for other versions of these software.
Disclaimer: Monitoring other people’s network traffic is a very bad idea and may be forbidden or even illegal in your case! Therefore, you may only apply these instructions if you own the Wi-Fi network and all its connected devices and you are the only user and no legal impediments whatsoever apply!
Installing Wireshark
I recommend to use Homebrew for this step because it makes installing and updating Wireshark really simple. In case you don’t already use it, Homebrew is a very popular package manager for macOS. Follow the instructions on their home page for installation. Once Homebrew is installed, you can install Wireshark in Terminal using
brew cask install wireshark
Wireshark provides an integrated update feature via the menu item Help » Check for Updates....
However, this doesn’t work for me because nothing ever happens, so I simply upgrade it using
brew cask reinstall wireshark
If you ever need to uninstall Wireshark, you can do that using (you guessed it)
brew cask uninstall wireshark
Any configuration data is saved in your home directory and will be preserved on re-installation or un-installation.
Obtaining The Wi-Fi Secret
Assuming that your Wi-Fi network is secured using WPA-Personal alias WPA-PSK, it is protected by a pre-shared key or even a password from which the pre-shared key gets derived. You need to copy this secret into the clipboard from which you will paste it into the Wireshark configuration later.
Further assuming that your Mac is already connected to this network, its secret is stored in the keychain. Otherwise, please connect your Mac to this network first.
In Terminal, launch the keychain management GUI using
open -a 'keychain access'
In the search box on the top right of the keychain window, enter the name of your Wi-Fi network, i.e. its SSID.
In my case it’s FRITZ!Box 7530 CT:

Right click on the list item, select Copy Password To Clipboard and enter your password in the upcoming dialog box.
Configuring The Wi-Fi Secret In Wireshark
In Terminal, launch Wireshark using
open -a wireshark
After startup, the main window shows you all the interfaces from which you may capture network traffic:

Ignore this for now and select the menu item Wireshark » Preferences... instead.
In the dialog, unfold the Protocols item and scroll down to IEEE 802.11 for Wi-Fi:
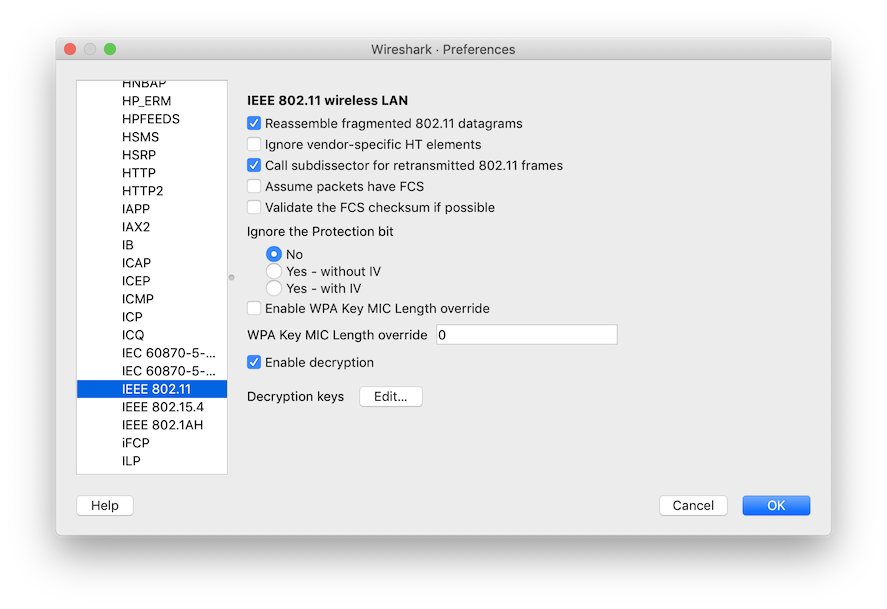
Click on the Edit... button to launch the following dialog:
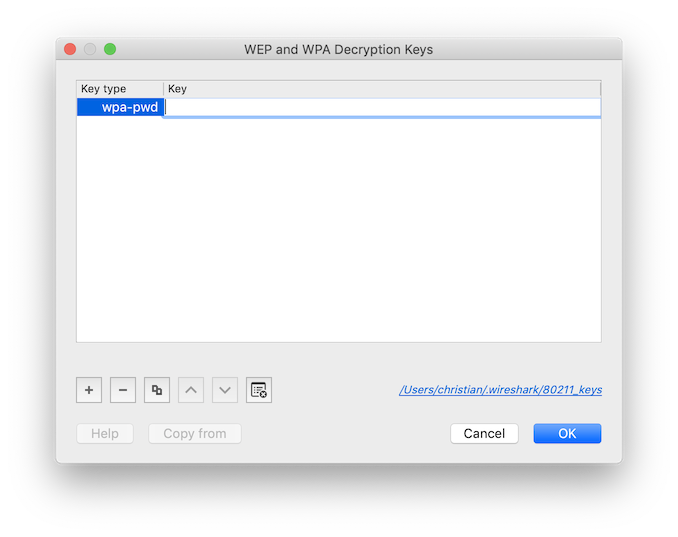
Click on the + button to start entering the secret.
In the Key type column, select wpa-psk or wpa-pwd, depending on if your secret is a pre-shared key or a password,
respectively.
If you are not sure, select wpa-psk first, paste the secret in the clipboard into the form using command-v and check
if the dialog accepts it.
Otherwise, select wpa-pwd and repeat.
You can enter secrets for multiple Wi-Fi networks, allowing you to monitor them all concurrently.
Once done, close all dialogs.
Capturing The Wi-Fi Network Traffic
Now that you have configured the secret for your Wi-Fi network, you can start monitoring the traffic of all connected
devices.
Select the menu item Capture » Options... to launch the following dialog:
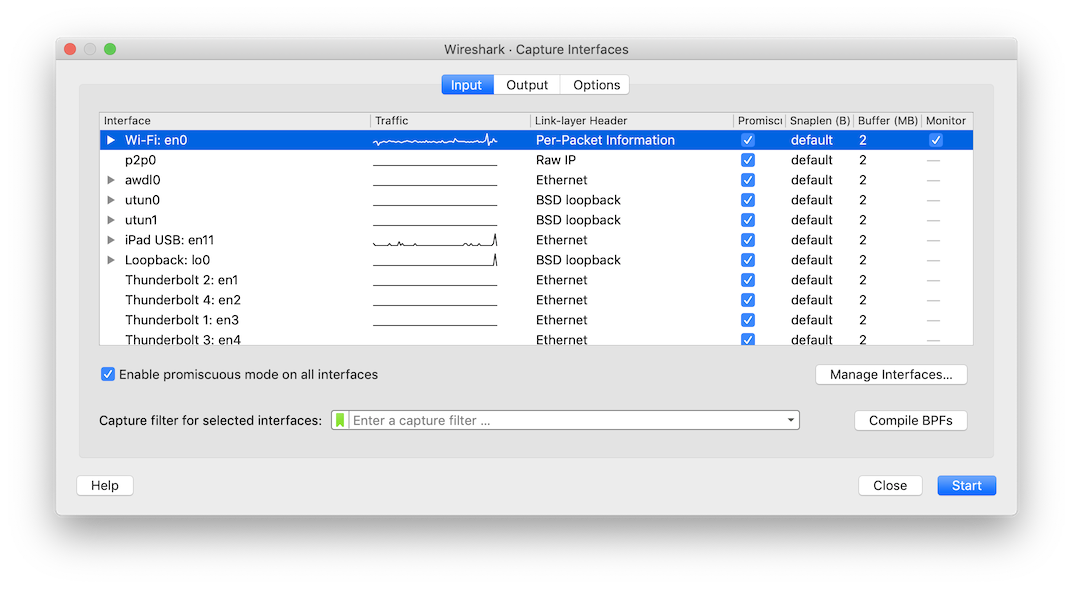
In here, select the list item representing your Wi-Fi interface and double click on the column Link-layer Header.
In the popup menu, select the list item Per-Packet Information.
This will prevent a lot of false positive network error messages later.
Most importantly, make sure to check the box Monitor or otherwise you will only ever see network traffic which is
intended for your local computer.
After clicking Start, Wireshark starts monitoring all packets from all Wi-Fi networks on the current channel within
the reach of your computer’s antenna - not just your network.
In the following capture, the beacon packets are from three different Wi-Fi networks on the current channel:

Initially, Wireshark shows 802.11 protocol packets only, so you won’t see packets from other protocols like ICMP, TCP or HTTP. This is because with WPA2, the 802.11 protocol packets are actually encrypted with a session key which gets derived from the pre-shared key, which in turn may be derived from the password. Wireshark has to learn the session key first by observing the exchange of a sequence of packets known as the EAPOL handshake. It will do so automatically for any secure Wi-Fi network who’s secrets you have configured. So all you have to do is to trigger the EAPOL handshake between the access point and the connected device, and the easiest way to do this is to switch its Wi-Fi interface off and on again.

In the preceding capture, first I have set the display filter to eapol || http.
Then I have switched the Wi-Fi interface of my iPad off and on again, which triggers the initial four EAPOL messages.
Then I have used Safari on my iPad to browse my blog’s home page at http://illegalexception.schlichtherle.de.
Note that the iPad and the web server exchange HTTP packets using both IPv4 and IPv6 addresses. This is not very efficient because it implies that there is no persistent TCP connection between the two hosts. As you can see, Wireshark is a very effective tool for analyzing issues like this.
Caveats
- Obviously, you will not be able to read the plain text of any encrypted network protocols like HTTPS or SSH.
- You may need to trigger the EAPOL handshake several times before Wireshark will be able to decrypt all data packets.
- Sometimes the monitoring computer may get disconnected from the Internet. You can easily fix this by stopping the monitoring and switching the Wi-Fi interface off and on again.
Summary
This mini tutorial showed you how to obtain the Wi-Fi secret from the keychain, configure Wireshark with it, start the monitoring and trigger the authentication handshake to make Wireshark learn about the session key for the connected devices.
When monitoring a secure Wi-Fi network, you need to configure the monitoring tool with the pre-shared key or the password for decrypting the data packets. This is because in monitor mode the interface driver will deliver the raw 802.11 packets to the application, leaving it to deal with all the necessary processing, including the decryption. In non-monitor mode however, it’s the interface driver’s responsibility to process each 802.11 packet which is intended for the local host, thereby filtering, decrypting and converting the packets to plain old Ethernet (802.3) packets before delivering them to the application.